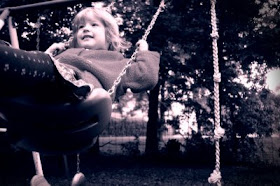
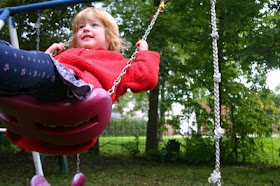
 Ok, so I took this photo of my little niece, Margot, playing on the swing set earlier this fall. It wasn't the worst photo I took, but it was a gray, yucky day, so none of the colors really popped, and it didn't seem to evoke much emotion. I guess my eye never settles on one particular spot in the photo, so it's not super interesting. I wanted to try and do something to bring a bit more focus to the shot. She was in a very dreamy sort of mood that day, closing her eyes and just swinging and swinging, and I thought that the right kind of processing would allow me to bring out that mood more in the photo. Here's the original photo for you to compare.
 I tried turning the photo black and white to see if it helped at all, but it still didn't help to draw the focus anywhere, if anything it made it worse by taking away her bright red sweatshirt. It just felt even more flat. I love the richer look of split toning so I thought I'd give it a try on this photo.
Here's a tutorial on how I achieved the look above.
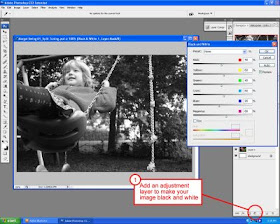
Step 1: Add an adjustment layer that turns the image black and white
Step 2: Add a Color Balance adjustment layer, select highlights, and move the dials towards the red, magenta, and yellow. This will warm up the bright areas of the photo.
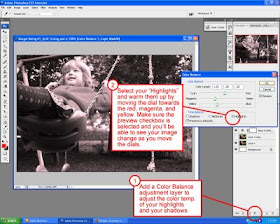
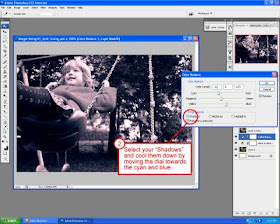
Step 3: With the Color Balance window still open, select shadows, and move the dials towards the cyan, green, and blue. This will cool down the dark areas of the photo.
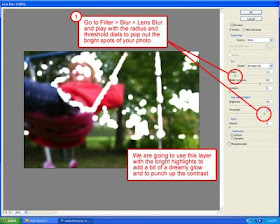
Step 4: To get the soft, dreamy look and punch up the contrast a bit. Duplicate the layer that your photo is on. Go to Filter > Blur > Lens blur then play with the threshold and radius to get nice bright spots that will highlight the sunny spots of your photo.
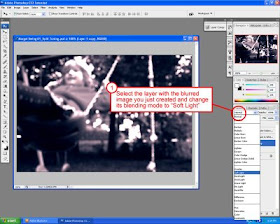
Step 5: Select the layer you've just blurred and change it's blending mode to "Soft Light"
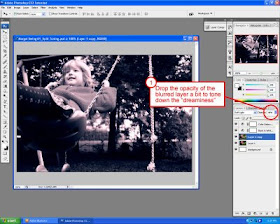
Step 6: Now lower the opacity on the image so that the "dreaminess" isn't overpowering. (Unless that's what you're going for) In this case, I just wanted a subtle hint of it.
And now you should have a nice split tone dreamy effect on your image. I'd love to hear thoughts or other tips that you may have concerning this photo or tutorial.
Sweet tutorial! Totally changes the feel on the picture! Can't wait to give this a try real soon. Thanks for the info!
ReplyDeleteRight on! Be sure to post when you do I cant wait to see!
ReplyDeleteNice insight on some PS features. I'll have to remember these!
ReplyDeleteNice effect! I'm definitely trying that too. I like how you take the time to post these tutorials and give back. I think there's a teacher in there....maybe? hint, hint.
ReplyDeleteaim-that's awesome! i'm excited to try this...thanks for taking the time to post it!
ReplyDeleteGlad to see it was a helpful post!
ReplyDeleteYeah, Dan, I feel guilty sometimes just take take taking from the internet. I'd love to teach another evening class at some point! Definitely let me know if you need any help in that arena! I just like my day job too much right now to give it up. ;)
You guys will definitely have to share the photos you split tone! Can't wait to see em!